TOOL TRICKS FROM MY WELDING STUDIO
by Roy Mackey
Hey here are a few of my tool tricks you may enjoy. I am always looking for things that streamline things. After all it is the details that make working in a studio so pleasurable. Sure it takes times setting things up but in the long run it really pays off.
Before I go any further though I would like to give a big round of applause to Rare Earth Magnets!! They really are a metalworkers godsend! Almost every tool I have is graced with one of them. They are priceless and keep all my tools within fingers reach. My biggest obstacle here is space. A common problem for a lot of us pre-lottery winners.
Note: a lot of the tools and tricks I have set up here are specifically for my needs. IE: I have low benches and thus low stools, use only TIG and oxy/acet torches and thus not much smoke or sparks. Also because I grind and weld metal about 25 feet from my fridge and kitchen it creates other problems that most welders do not need to worry about. I really do live in my "shop" here which may sound fun but can get a little trying if you don't like everything you eat or sleep on to be covered in iron dust !!!! Thus a lot of these tricks might not be of much value to most. Just the same they have sure helped out here.
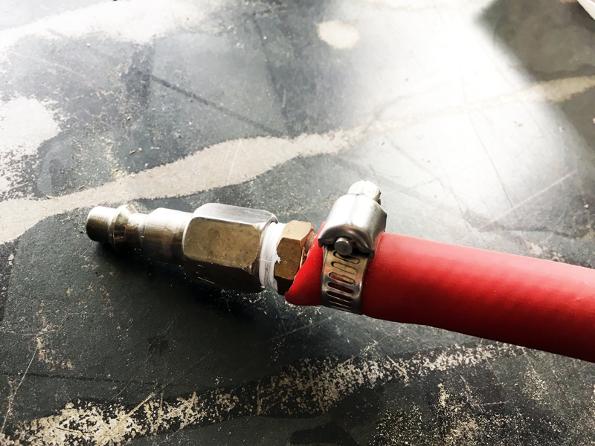
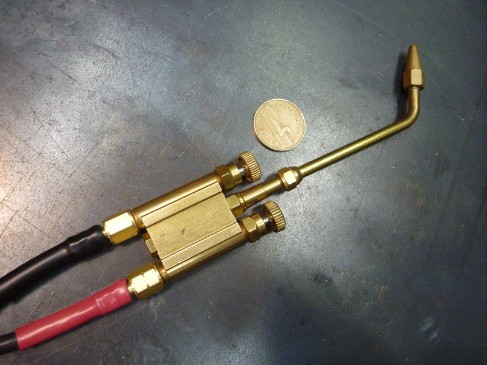
Take one air hose end with finger snagging hose clamp...
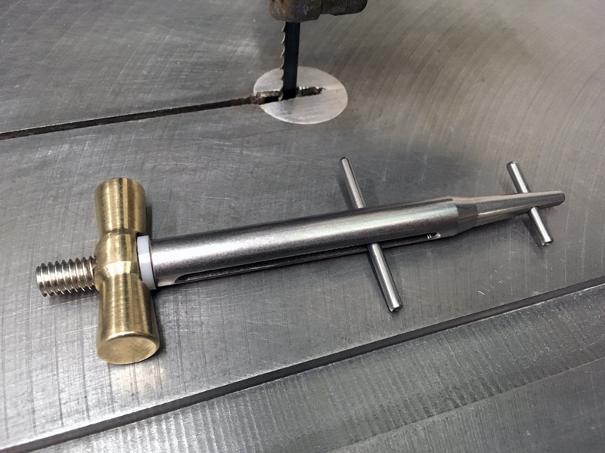
Mix in one strange little tool with some stainless wire...
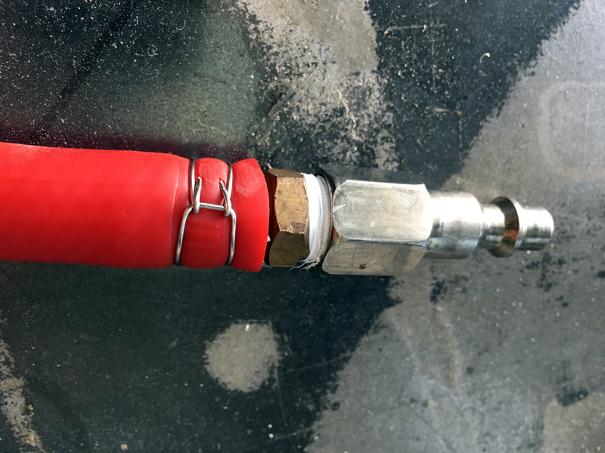
Viola... one nice clean clamp that is smoother and holds a lot tighter!!!
Just need to add a little shrink tube and it'll look even better!
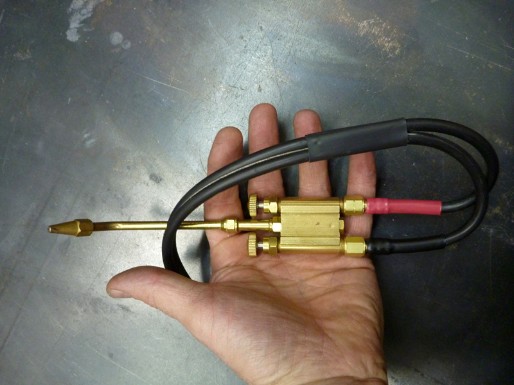
Clamptite Tool
Clamptite... buy one... cheap too... only cost me about $125. Canadian to get one shipped up here to Canada on pack horses. Best thing ever if you want to ditch hozer clamps once and for all. No more cut hands or loosening clamps. Google them. Definitely a tool not worth living with out. Though the lady on their videos makes it look easier than it is even I eventually figured it out... once I finally dug out the instructions that is.
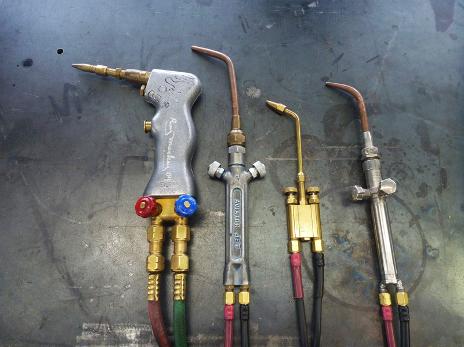
My Four Main Welding Torches
Here are my four main welding torches right now. I have two more that I like but don't have them hooked up to my manifold yet. These are all gems and if you gas weld lots having all four is really sweet. That way you always have the right torch for the right situation. I have to add my Victor J100C and my Smiths Jewelers torch. I might even add an older Dillon torch I have and set it up for just cutting. The cobra/dillon torches cut like a dream but only in straight lines. Check out the video to see more about them and the manifold I have them hooked up to.
My Six Favorite Torches Video
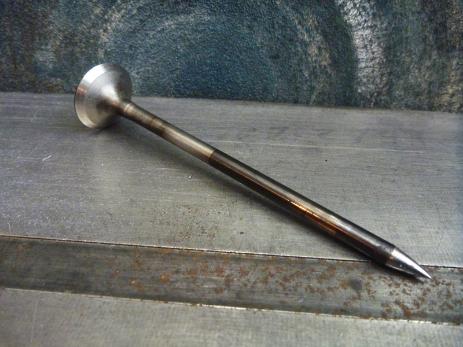
Metal Scribe From Old Engine Valve
I have no idea what this valve is out of but boy does it make a great metal scribe. I got this idea off some old timer who had moved beyond the great divide. It was in a bucket of rusty bolts going out the dumpster just because someone broke a glass jar of strychnine on them. It amazes me what people will throw out. Anyway I rinsed them off in the kitchen sink, picked out the broken glass and then went through them all. Luckily I found this gem. I have no clue what this valve is out of but man is it a great scribe!!! It is incredible how well it holds it's edge and feels good in the hand. Also because it has the big end it with stand upright making it easier grab and won't roll off the bloody work bench all the time.
This thing sure beats those pot metal ones all the China tool stores around town sell. In fact if you were ambitious you could gather up a tonne of these, make them into scribes, sell them and build up a good name for quality products. Then when enough people build up enough trust in your name go to China and get them to make you some pot metal ones. That way people have to keep buying more because they keep breaking. You could get rich!!! Hey don't laugh if you are fast it could work. You just have to get on it before China finally gets it's military in order and starts jacking up their prices.
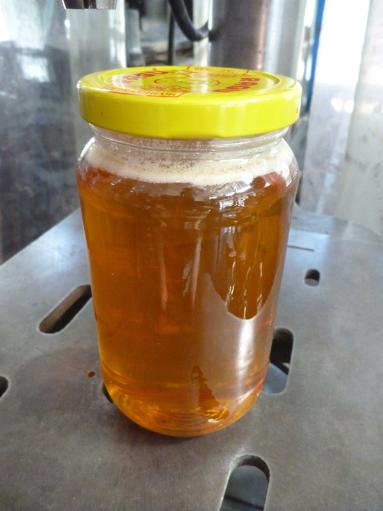
Honey???? WTF???
Sept/6/2012
Here is my number one all time favorite trick and must have for my welding studio... and should be for yours also, especially if you play with fire or hot things much. A fresh jar of my Dad's unpasteurized honey.
Why??? well there is nothing that matches the pain relieving qualities of honey when applied to burns. Now I know there are all sorts of wives tales out there about putting this or that on your burns. You know things like butter and other disgusting chemical laden stuff from the druggies store. Honey though is not the same!!! Let me explain. First off is the obvious and that is the second you put the honey on the burn the pain stops immediately! I have seen this numerous times with me and others that have tried it. The second is not so obvious. You may not know this but bacteria cannot live in or on honey. Ever notice no matter how old honey gets you never see it go moldy or bad? Well you ain't the only one. Honey has been found in Egyptian tombs and was still edible after two thousand years. Sure it will crystallize over time but if you warm it up slightly it will soften again and be as good as new.
The reason I know all this is because my Dad was a bee keeper. For years Dad would rant and rave to me about the amazing properties of unpasteurized honey and especially how great it was for burns. Now, years later, I finally read about how burn clinics are using honey on bad burns in order to avoid having to wash really bad burns. This saves a ton of agonizing and blood curdling screaming by the burn victim while getting the burn... scrubbed. Burns have to be scrubbed so infection does not take hold. But wait... did I not say that bacteria cannot live in honey and if so why not just spread some on the burn. It makes perfect sense to me as I have done it with some real blistered cookers to my pinkies and other bodily parts. Considering it makes the pain stop immediately it is win/win.
Eventually some scientist will figure out a way to add chemicals to it and then patent the formula. Once that happens you will see this magic cure on the shelves. Sure it won't be quite as good as real honey and will cost way more but at least others will hear about it. My guess that will be in about twenty years since that is the medical communities favorite time line for cures. In the meantime though give it a try I assure you that you will be amazed.
Now as you know with most cuts burns etc the goal is to keep the wounded area clean, not so you can look pretty but to help avoid infection. Now think about putting warm butter on a burn... think there is much bacteria in warm butter? How about peanut butter then.... Nope stick to unpasteurized honey you will be glad you did!!!!!
Oh you can thank my Dad for that trick.... which I know you won't... that is until your next bad burn when you try this amazing trick. As an added note putting your burn under cold water will also stop the pain... until you take it out of the water that is.... then the pain comes back as strong as ever. My worst burn was to my finger tips... all of them and badly. Now that sucked. Hurt like hell and sure the honey stopped the pain but I could not grab or do anything. It was brutal. I then honey'ed up some bandages and put them on each finger. I managed to get some work done that way but could still not pick my nose for a few days.
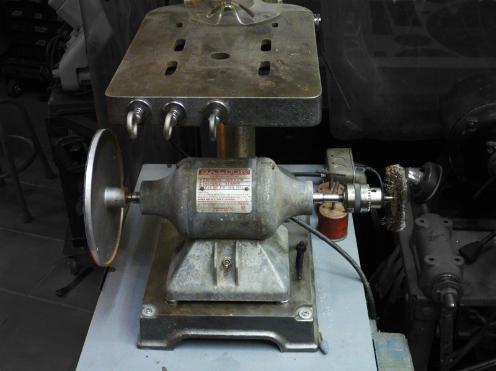
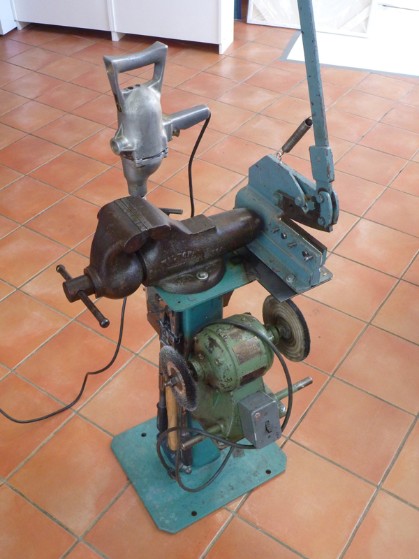
Drill Chuck on Bench Grinder Trick
Here is my latest Mackey Mouse setup. This is an older Baldor 1/3rd hp 3450 rpm bench grinder. I heaved the stones and guards etc. Then mounted a velcro eight inch disc I picked up at a basement sale. On the other end I added a half inch Craftsman drill chuck. I actually threaded right on. I then replaced the rubber feet with rare earth magnets. That way with a little work I can get it out from under my drill press table and mount it on my steel work bench top. This would not be great if you had long hair or had a thing for loose ties or clothing. Otherwise though what a handy rig!! Mount what ever you want in the chuck. It has a nice sense of danger also which helps amp up my otherwise very dull life. The disc removes material like you would not believe. Quick change velcro also makes it great. I have been trying to figure out how to mount a chuck to my other cheapo imported bench grinders with no luck. They all have weird threads. Don't quite understand why but this ole American made one worked like a dang.

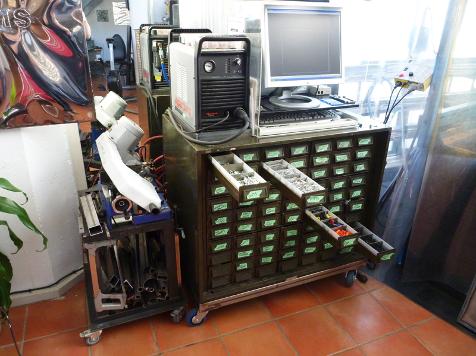
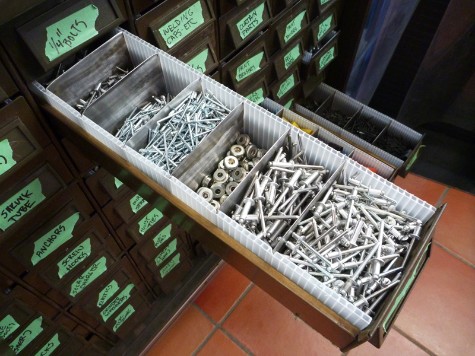
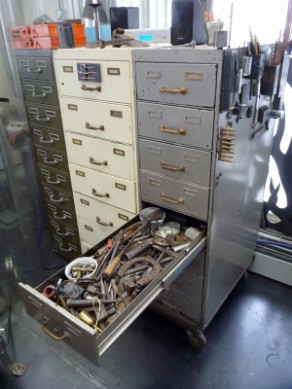
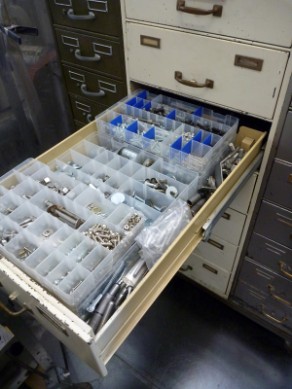
Part and Tool Sorter
Feb/5/2012
Here is a old and somewhat rusty cabinet I picked up awhile back off a nice lady and apparently fan of vintage stuff as her "home" sounded like a real vintage classic to say the least. She gave me a good deal so I had no choice but to dragit home. The bottom base, about two inches up on one side was rusted right off so it looked like the leaning tower of junk. I guess I could have looked for a better one but it looked like a fun challenge. Not only that being an artist I am already well versed at wasting time in neat and fun ways. Thus I cut the rest of the base off to leveler up a bit. Then I welded up a base to fit tight around the bottom of it. Next I sat it on this old steel stand I made a few years ago and no longer use.
This is going to be a great cabinet for my storage locker to sort and store nuts, bolts, pipe fittings, gold coins and bits of plutonium I picked up off this Russian guy cheap one time. I am telling you I swear a guy could get rich by just designing some way to sort stuff for cheap. Every shop in North America needs small parts and bolts storage. Up until now there only two types of designers working on this... crack heads who think shop space is free and that everyone has thousands of square feet to waste. These are the same guys who design shop vac's to take up more space than a full sized fridge and usually with such round odd ball shapes you can't put nothing on top of them. The other group are some retired lawyers who think every guy with a small shop is as rich as they are. Thus can spend thousands to store their rusty old bolt collection. This is a low cost alternative to that and will actually work quite well.
Needless to say I did have to hit it with a bit of polish and fine steel wool to pull out the patina a little more. Now it is off to storage to have and hold all my valuables!
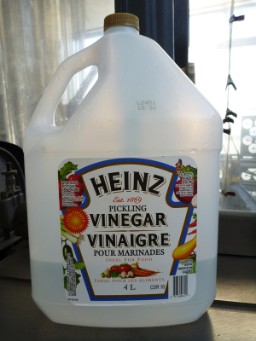
Cad Plating Remover Trick
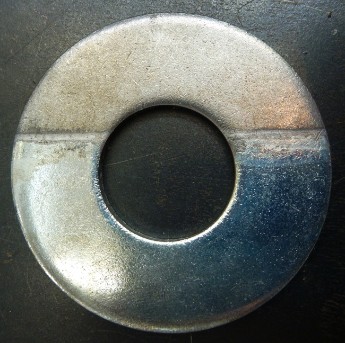
Feb/4/2012 Here is a recent score I discovered awhile back while surfing the beast. Good ole pickling vinegar! It is now my all time favorite shop liquid next to lacquer thinner. Why because it is cheap and eats off cad plating and galvanizing off of steel !!!!!!! Check out this washer above. I soaked exactly one half of this washer in vinegar for a couple of hours or so. Viola cad-be-gone on the top... cad-still-there on the bottom! Now I can weld it without killing myself or anything outside of my exhaust fan.
I now strip most of my new nuts, bolts and washers using this. Especially one I am using to fix up old vintage tools. After all to me nothing makes them look worse than new shiny bolts. Thus I just pop em in the vinegar for a few hours and like magic it is gone. Now I would not recommend using the vinegar afterwards on your french fries. Just the same it sure cleans off the plating nice and easy... for cheap!! This gallon only cost me six bucks. Now I know it would be easier to just buy un-plated bolts and nuts but accountants will not allow most stores to stock un-plated ones in case they don't sell well.
The best part is the fact it does not etch or frost up the steel like some rust removers do if you leave it in too long. The vinegar leaves the original metal looking like new. I have even left some in there for a day or more and all I noticed is that they tend to go black but two seconds on the wire wheel and they look brand new. No more breathing toxic and deadly cad fumes!!
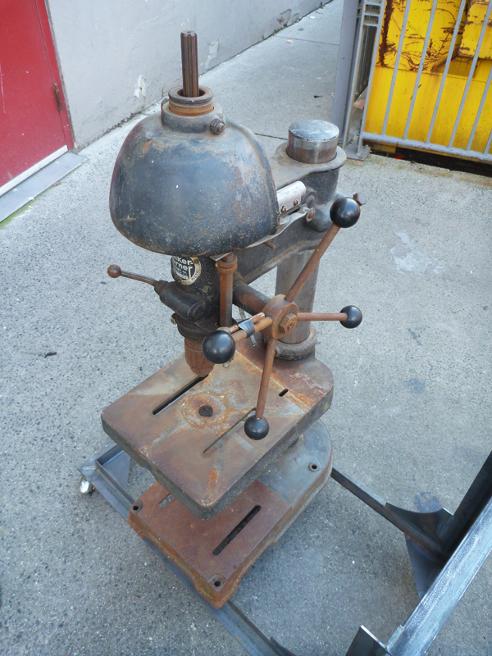
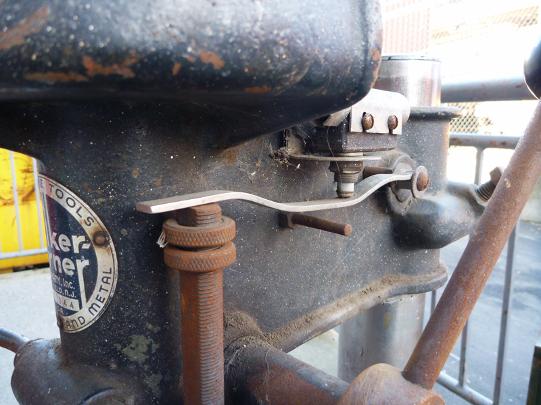
Home Made Drill Press On/Off Switch
Here is a cool vintage Walker Turner drill press I just picked up at the scrap yard. A great score for a few reasons but check out this really cool switch. From what I can tell this was used to turn the drill press on. Just pull down the handle and viola! Sure might be a bit dangerous but life is dangerous. I am just not sure I want to move this to my other Walker Turner. I am hoping that I can eventually find the motor mount for this drill press. I appears when they took off the motor they pulled the motor they just loosened the mount and pulled it out. If I can find the mount I think I will do a full restore on this one. Maybe set it up strictly for woodwork. In the meantime I might just rig something similar up on my other WT.
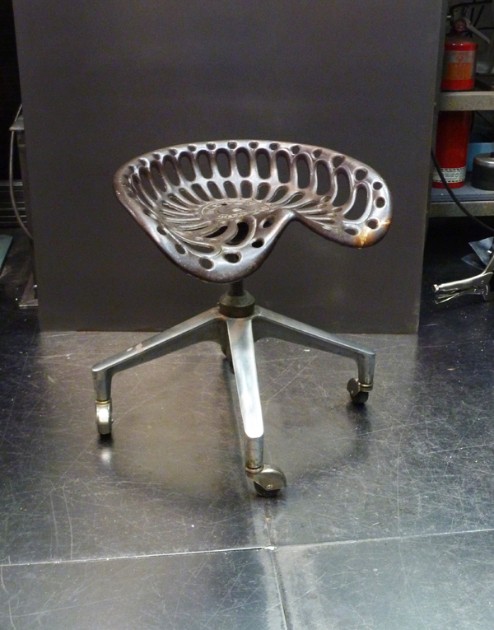
My Second Ultimate Welding Stool
Here is another one of my welding chairs I rigged up. This one is an old 1905 Massey cast iron one. Tin ones are no comparison to these for comfort. Absolutely incredible. This one here does not have the hydraulic quick adjust but is not a big deal. Originally I had it mounted on a cheapo Cambodia tire base. It was a light flimsy piece of landfill and is partially to blame for the chip I put in this seat. It slipped out from underneath me and chipped out a piece when it hit the floor. I was mad for three weeks... My own stupidity for having anything from that place in my studio I guess. Just the same I managed to tig-braze the chip back in place. At least the comfort of this beauty was not affected . I could sit on this all day. The nice thing is when welding sparks land on it they do not smell like burning plastic. Totally fire proof and completely comfortable. You would have to actually sit on this to see what I mean. Try it at our next open studio if you are in the area. I only charge a dollar to try it out!! : )
Jan/11/2012
Herez my Meco Midget torch. Yes what a beauty this thing is. If you gas weld much then this is one gem you have to get. It may be small but this torch is incredible. Got some 1/4" plate you need gas welded? No problem at all I have done it a couple of times. The main body is slightly bigger than a box of matches but don't let the size fool you. This one is right in there with my top four torches. I have a set up where I can spark up six different torches (one at a time of course) with out having to pull wrenches. It even has a fuel saver on it. I will be posting some pics of that once I finish the changes I have planned for it. Anyway if you want one of these beauties or you just want to see the website for the God of welding then check out this link:
Seriously this Kent guy is incredible and his site is huge inspiration if you like gas welding. It is one of my favorite sites when it comes to gas welding for sure!!! He has got cool stuff and knows what he is talking about. If I ever grow up get a life, haircut and a real job I will be ordering more goodies from him for sure. I have ordered from him in the past and have always got very fast and friendly service. Definitely a place you want to go back to.
Jan/12/2012
Here is my recent purchase from the God of Gas welding's site above. Super flexible gas hose. Man what a dream this hose is to work with!!! How did I ever live without it up until now? It is absolutely incredible. In fact I just ordered two more sets. Man If I would have only had the brains and cash when I first started gas welding 30 years ago. I would have bought nothing but the best. I feel sorry for all those victims out there who get boned every day out of their hard earned cash for cheapo imported tools. Not only do they send their child's job overseas but they end up with tools that barely work in comparison and make learning to use the tool properly twice as hard. On top of that cheap tools are dangerous and expensive since you have to buy them more than once as they rarely last long. Not only that a wise man once told me that you can't do good work with cheap tools. Good tools and good quality go hand in hand.
The Ultimate Gas Torch Finally Determined!!!
Yes everyone it is true... the ultimate gas torch award as determined by me is.... ALL SIX. Yes by having six different gas torches you cover all your bases and always have the right one or at least your preference for the right job. Do you have to be rich? Nope I scored half of mine for next to nothing on craigslist. You see gas welding is something you have to learn to do Not like the iPhone which is self explanatory. Because of this most people would rather just buy a mig and to hell with the rest. Easier to just push one button and if you get good at it you likely don't need anything else anyway.
But some people just like the older methods and yes they have advantages. Anyway I am not one of those guys who rants and raves about how great one torch is over all the others. Almost all my favorite torches have their pros and cons. That's why I presently have the six torches hooked up ready to go. Of course I have the Meco Midget above, then the Cobra (Dillon), the Meco Aviator Jet, the Smiths Airline, the Victor J100, and the Smith Little Torch. I also got an extra Cobra, actually this one is older thus a Dillon that I might hook up later for just cutting. They do make a sweet straight line cut. Too much hassle to switch back and forth from cutting to welding with the one torch especially when I have the PlasmaCam sitting there ready to go.
Dec/11/2011
Bolt Sorting Finally Solved
Here is my latest edition to my welding area. My bolt sorter bin. I scored this old 70 drawer card file cabinet for a good price and figured out it would make an excellent sorter bin. Sure enough it works like a dang. Check out the pics below to see how you can do something similar to make your own. In fact if you had some ambition you could use the idea to get rich, meet chicks and travel the world without having to kill people to do it.
Here is what each drawer looks like. I used coroplast for the sides. Then using my cnc machine I cut out 340 steel divider plates... easier to have cnc machine to do that!!! Then as you can see in the pic below using an olfa knife I cut through the inner layer of the plastic on both sides and then just slid the diver into the slots. Worked like a dang and with a little effort can move them if needed. If you knew someone in the plastics business all they would have to do is make sheets of ribbed plastic. Some ribbed and some smooth and in sheets. You then pack the sheets home and cut them into strips like I cut the coroplast. It would be universal and easily made to fit any drawer. Could be used by anyone who has a screw loose like my Dad always said I did. Not any more though. I got all my loose screws neatly tucked away for easy access. Another neat/bad feature about these drawers is they pull right out. So if you are sleeping you have bolt soup on the floor, but if you want to take the drawer over to where you are working no problem. Nice and easy.
Strange as it may seem if I won the lottery this would be the first thing I would grab when moving. In fact way before I took my cnc machine. This seems crazy I know but the truth is with millions it would be quicker for me to order the newer larger plasmacam and have it shipped to my new address that it would be to take this one all apart and move it myself to the new place. After all if you have millions money is no longer your issue... TIME is. To duplicate this cabinet with all the bits and pieces, a lot being vintage parts and pieces would take forever! I would rather spend my time else where like cutting up fresh stainless on my New PlasmaCam!!! Yes time is the new money then. You know now that I think of it I could use a little less time and a lot more money!!!
Seventy drawers does not seem like that many until you try pulling them all out. It is amazing how long it takes!!! Needless to say it ate up a ton of loose bits around my studio.
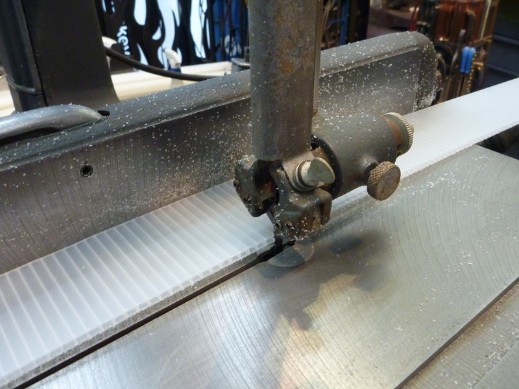
Here I am putting my vintage Beaver band saw to good use cutting the strips of coroplast. I kicked ideas around for this bin forever it seemed before coming up with this one. What makes it feasible is the fact I have a cnc machine to cut the plates. You could get away with something thicker for dividers like maybe masonite or something and then just cut it on your table saw. I think that crap comes quite thin also. Of course you would have to cut the slots out thicker also which would not be that bad.
Home Made Tig Holder
Here is my home made tig holder. I made this one up out of pure frustration with those other useless puzzle holders. I think that is where I got the magnet base.... actually no I threw that one out. This one I got of a ground clamp thing. Anyway I added the pipe piece and now just drop the back piece of the torch into the pipe and viola. The nice thing with this is it is easy and the handle has some give to it. If you bump it then it just swings out of the way. It is very unlikely to fall out of this also. When you want it though you just lift it up and viola.
This is another one of those get rich quick ideas. Go to China, get them to make it cheap, sell it to all the welders needing it, make a fortune, use that fortune to help pay your unemployed kids way through life. At least you won't be getting handouts and can tell that old "we worked for a living when we were your age" story on them.

Steel Cleaner
Well if you are a seasoned welder by trade or not you probably already know how great Windex is for removing those stubborn stains from you welding bench or shop floor. It's also great as a pre-cleaner for greasy wrenches before you give them a good buffing with chrome polish on the buffing wheel. One of my favorite uses of it though is for removing the greasy oil on fresh sheets of cold rolled steel. I used to always use lacquer thinner or solvent but it always left streaks no matter how much I used. Sure Windex don't smell near as good as Lacquer thinner but seriously no streaks, clean and oil free about twice as fast. It leaves the steel bone dry and residue free for treatment with metal etch or whatever. The only drawback with Windex is the fact it's not flammable like lacquer thinner is. So needless you can't play around burning things every time you clean up your steel. Of course Windex has that carcinogenic stink also which is likely not good for you.
NOTE: for some strange reason the last batch of windex I bought does not do what I said it does above near as well now??? Not sure why as I have been using it for this purpose for years. My guess is the company figured out a way to stop using some of the more expensive ingredients and thus it appears to not be the same. It is a great trick that accountants learn while doing their training in hell. Of course always fails in the long run. Though keeping shareholders happy in these tough economic times is often the only goal. This is what makes it so popular these days. After all most companies, except Apple of course, think people are stupid anyway. Might be true but all I know is it no longer works like it used to.
Paint Can Trick
Here is a great trick I learned from an old Popular Mechanics book I was reading back when I was two. When you put your paint cans away on the shelf flip them upside down. It keeps them from getting a dry skim on the top making it a lot easier next time you need to paint! Of course if you do this you do want to make sure your lids are sealing right! It works every time and sure saves a lot of paint. Of course paint companies will never tell you this as they sell paint and want you to waste it.
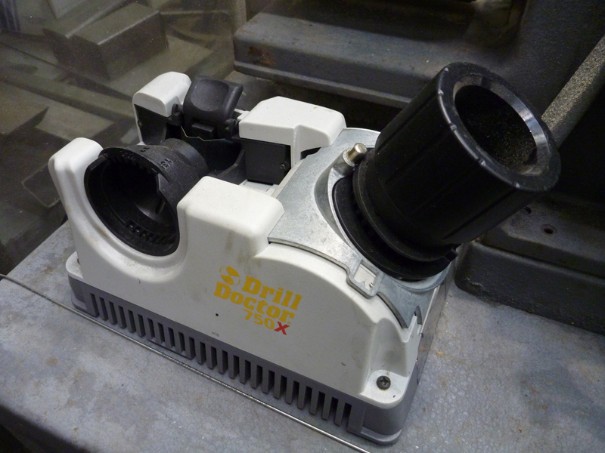
Drill Doctor
Yup a drill doctor, all plastic and in my studio!!! Well what can I say this tool is one of the cheapest tools I bought including the ones I picked up at garage sales. Why? Well like they say in the adds it pays for itself the day you buy it. How? Well the day or so after you figure out how to actually use the dang thing you can sharpen all your bits basically taking junk bits and making them into useable tools again. No more melting holes in metal. Done properly a freshly sharpened bit cuts like butter!!! This thing makes drilling holes in1/4 inch plate pure pleasure!! The agony it can save you is beyond belief.
Like I mentioned this is not a tool that you can buy, quickly plug in and start using. It actually requires a little thinking to figure out... even if you never had to read directions before. Once you get the learning curve out of the way no problem. If you have a dull bit just pop it in here, move it over there then back here turn it a couple of times and sharp bit!!! Oh sure if you are Einstein you could sharpen them on your grinder. Most braggarts say its a piece of cake. Real people though know they are lying and it is bloody tricky. This thing does it perfectly. This is any small shops priority must have! $200. give or take but once you got it you got it. It's the last thing you WANT to buy but if you are smart then it is the first thing you NEED to buy. There are cheaper models but this one has perks their other models don't have so I opted for it.
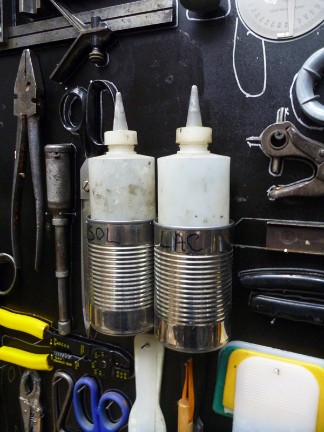
Solvent Savers
Here is one of my more funner tricks. Each of the bottles I have filled with solvents. One regular paint thinner and the other lacquer thinner. I am always using lacquer thinner in my studio for cleaning up stuff. Partly because of the smell and partly because it pretty well dissolves everything. On top of that it is highly flammable and thus extremely dangerous. This creates a bit of excitement in my otherwise very dull life. Oh sure I am not convinced I would use it so much in a wood shop but for here its great. I got the bottles at some kitchen supply place. Of course you have to make sure that the solvent does not dissolve them first. These two I have been using for years. They fit quite nicely inside the old soup cans. When things get a little boring around the studio I can always spark up a little fire for something to do. The nice thing about them is you can squirt out just the smallest amount of solvent if you need. This can save you an incredible amount of solvent over the year. Plus with pouring it out of the can you risk spilling the whole dang can! Of course if you are familiar with lacquer thinner it is not something you want to spill a gallon of all over the floor next to your furnace!!!!!!!! Ventilation is highly recommended when using that stuff if you don't want to be putting a new roof on your joint. Do I hear Bomb!!!
Razor Blade Dispenser
You know the nice thing about being a lazy artist with apparently more money than brains and a cnc machine is the fact you can fiddle around all day making useless stuff that means absolutely nothing. This here is a cnc cut ten gauge plate steel razor blade dispenser. It has rare earth magnets on the back so it will stick to the cabinet below. I don't know about you but I love straight back razor blades. They are so handy for almost anything. I use tons of them always have. The nice thing about this dispenser is you just slide one or two out the bottom and away you go. No fiddling around trying to find the box of them. Once they are all gone you just open up a new box and slide it into the dispenser. I did make a little steel weight to help keep the blades from sticking up and not falling down.
If this was made of plastic you could probably sell thousands of them since every shop would have to have one. If you have some of the ambition I lack you might want to run with this idea. I am sure it could make you a lot of money!!

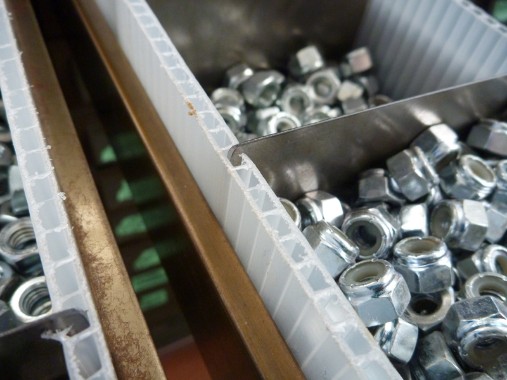
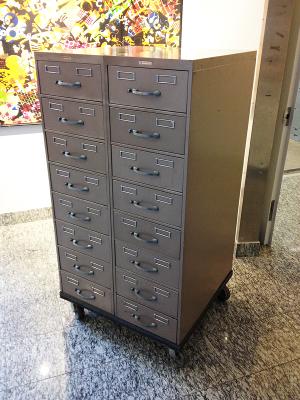
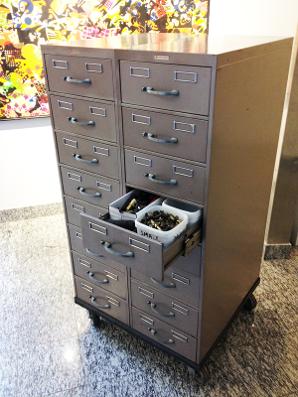
Vintage Card File Cabinets For Part Sorting
Here is my latest solution for storing all sorts of odd ball tools, some bolts and screws and misc. other crap. Three vintage card file cabinets. It took awhile to come up with these three but was worth it. These are incredible since the drawers are over two feet deep. They have roller bearing slides and even when full of very heavy steel bits can be pulled out almost effortlessly. Now that I have this three quarters full I am guessing it weighs around 1500 lbs or more. It holds and sorts out an incredible amount of crap making it very easy to find. I bolted the cabinets together which makes them extremely stable. The previous wheels I tried on the dolly were rated at 250 lbs a wheel and basically froze up once the cabinets were loaded onto it without the drawers!! I then went back to these wheels and even loaded I can still move it around with a little effort.
I am guessing that each drawer weighs between eighty and one hundred and twenty pounds. Though it was rather cheap to get this set up the contents are likely the most expensive part of my studio next to my cnc machine! If you don't think so just go to Hopeless depot and price a handful of bolts and fittings!! Each of the white ish drawers three layers of the plano sorter bins, nine per drawer. This cabinet eats junk like no tomorrow!!! The best part is I can now actually find the stuff I have in it when I need that stuff !!!
Multi Tool Stand
Here is another addition to my tool organization. This one is a real gem. It holds my vise, metal shear, one of my six bench grinders and my JD 2 tube notcher. Not to mention my bolt cutters, a small sledge hammer, and a hand made steel dustpan. None of these tools I use enough warrant them having their own station so to speak. This way I can just drag it out from the wall and then spin it to the tool I want to use. Ideal for our studio here with space being at a premium. The footprint is about 16" square.
Finally, thanks to George here in Vancouver, I scored a pre-plastic non carcinogenic drill. It was one of his Dad's and goes way back there. Works like a dang. Not sure what I will do with the old plastic drill, likely throw it out since I have already used it a dozen times. Last time I used it it was making a strange grinding sound.
At one point I almost sold the shear but decided to clamp it to my bench to see if I would need it.... I could not believe how good it actually worked and how much I use it so it now stays. It is an old English model of some sort. Now normally the bench grinder would be a little low but I needed one lower for times I have a ton of parts to clean up and want to sit down while I do it. This works perfectly.
Luckily since I took the time to give this a nice patina it goes very well in our kitchen since we do still have some unused space in that area. Saves me cluttering up my actual welding area.
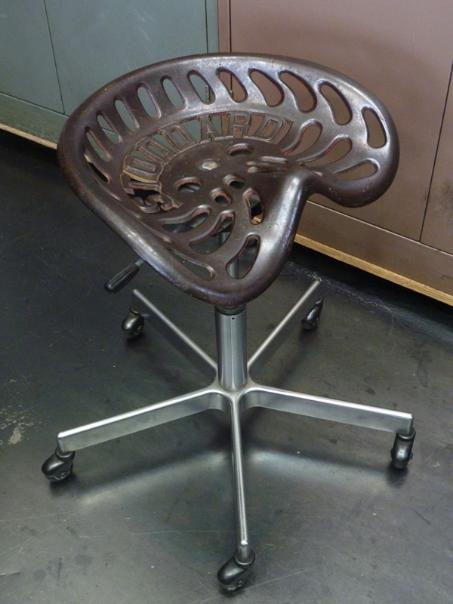
The Perfect 1905 Welding Stool
Check out the stool I made up for my cnc machine computer. This is no Iskea cheapo. The base is real cast aluminum off a very good quality office chair. It has the quick height adjust. The seat is a cast iron model off a 1905 Stoddart Hay Maker! Man on top of being fire proof you can sit on that sucker all day! I actually made up two one for my office desk also. They stopped making these seats out of cast iron around 1910 or so. After that they were stamped steel similar to the newer ones today. If you know any old farmers from back in that day they will tell you the cast iron ones were the deluxe ones by a mile. This is actually an upgraded shot after I got rid of the carcinogenic plastic wheels and put on these vintage darkors... a fine wheel that is re-buildable with new bearings. I figure should actually last me another sixty years. After that I might put on some new ones to freshen them up.
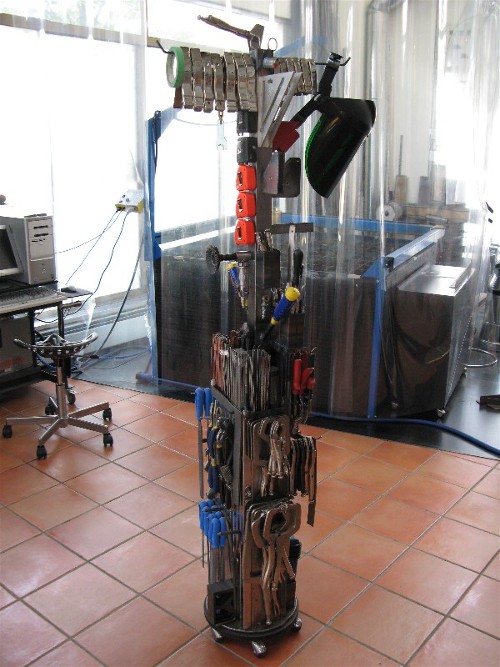
Here is one of my most valuable tool organizers I ever built. This thing is incredible for my needs and would be lost without it. It saves me so much time it is unreal.
This thing has a heavy duty swivel base along with top quality wheels to handle the weight. This whole set up with tools is very heavy and actually kind of tippy but works for me just fine. The nice part is while sitting on my welding stool I can swing my foot over and using my toe rotate the stand so that I can reach any tool on the stand easily. It makes putting away tools also extremely easy since the stand is metal and I have installed magnets in most of my tools.
This stand is continually evolving as I figure out new tools that I need to have handy.
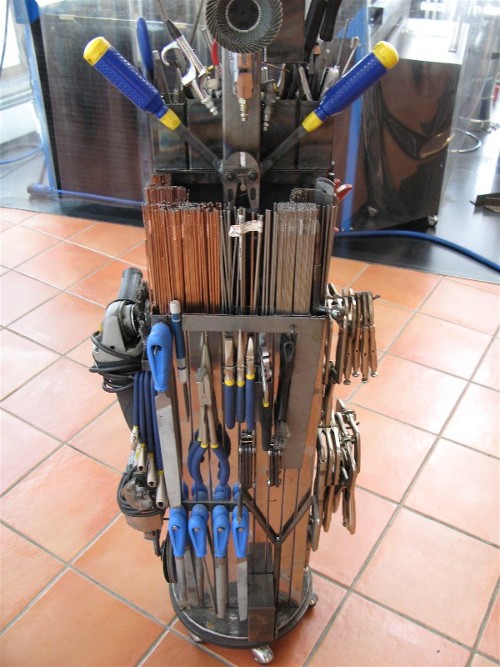
As you can see I have packed almost every inch with the tools that I use regularly. Since floor space is at a premium in our studio this has been a real score. It’s foot print is just over one foot square and yet holds a ton of tools, welding rods etc. Even though I have since added even more tools there are still places I can squeeze stuff in yet.
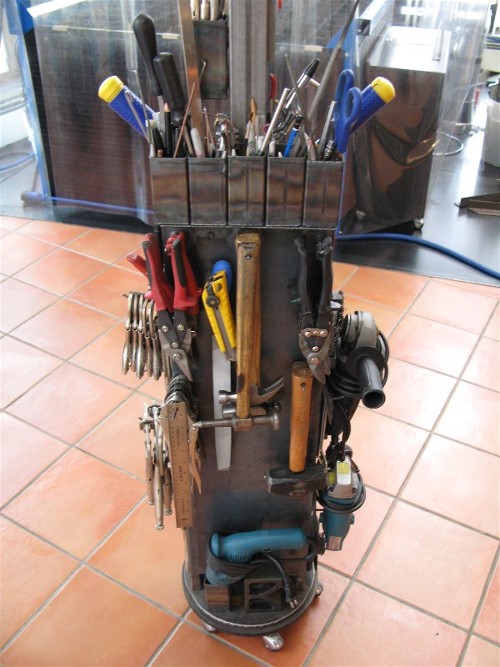
All four sides holds tools of some sort. The pen and file holders etc have rare earth magnets on the bottoms which keeps them from falling off the ledge when I move them. Or if I want to move them to my bench the same thing.
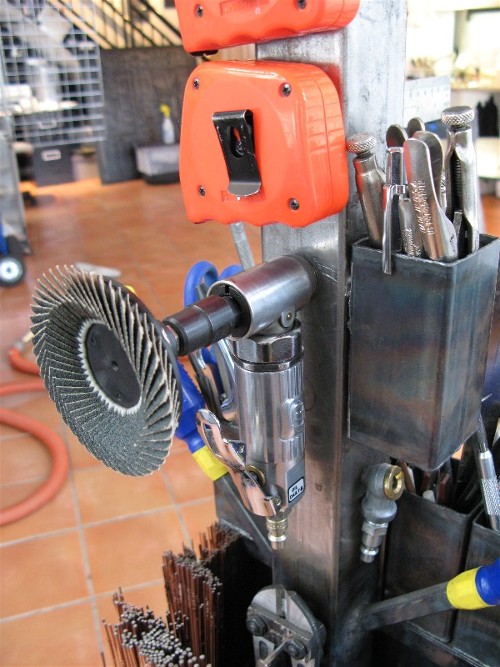
Like I said I have magnets mounted to almost all my tools. Even this air grinder. Since almost everything in my studio is metal including the floor finding a place to stick this tool is easy. The tape measures also have magnets.
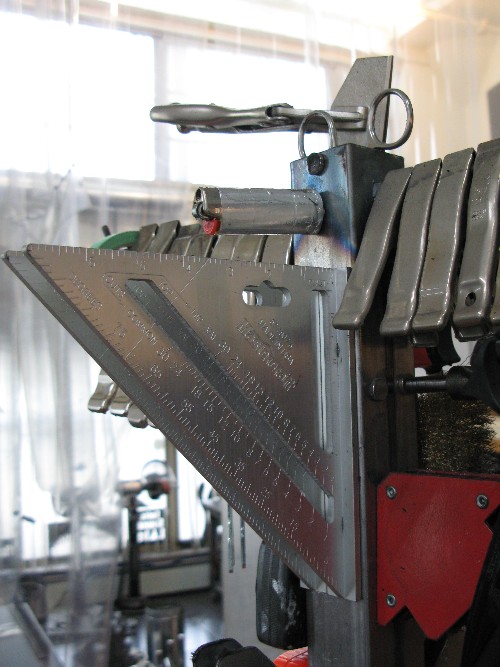
Yes the bic lighter has a magnet and so do the aluminum squares. The ones on the squares had to be countersunk flush.
Vintage Card File Cabinets
Vintage card file cabinets are the best score you can imagine for storing useless small junk like pipe fitting, screws, bolts etc. Most of the stuff you will likely never use but if you did need it then it would save you driving all around town trying to find some place that actually still stocks that stuff!! Now a lot of these have dividers down the middle which is no big deal. Usually you can just pull out the drawer, flip it over and bend some tabs back to remove the dividers if needed. By the way the drawers on these come out very easily once you figure out how. That sometimes requires a little thinking though. So if you are having to force them you are doing it wrong. Remember these were made back when people could think for themselves without instructions.
One of the best things about card-file cabinets is they often have heavy duty ball bearing sliders which means each drawer can be filled with a ton of steel junk and still easily be opened or closed. I built an angle iron base whith wheels for this one for easier moving when cleaning up etc. Just remember that these were made years ago before plastic and accountants started to take over and destroy the world so are very heavy even before you put the junk in. Thus make sure you put very good wheels on the frame if you do!!! Also you should know that Hopeless Depot does not sell "very good" wheels. I estimate that my similar setup shown up higher weighs in at around 1600 lbs or more.
First Version of My Tubing Notcher
This here is the first stand that I built for my JD2 tubing notcher. I got this notcher from none other than....actually I have since threw out the cheapo drill and used the stand for a 1938 Walker Turner scroll saw I have here.
They have a great website with reeel cool selection of top notch tools. I have ordered from them a few times and always got great service! I highly recommend these guys!! This notcher is top quality and makes beautiful notches. I previously tried a “Hail China” notcher but of course as usual that was just money down the drain. Most smart metal workers know cheep tools are just too expensive! Hell even I am learning that… slowly.

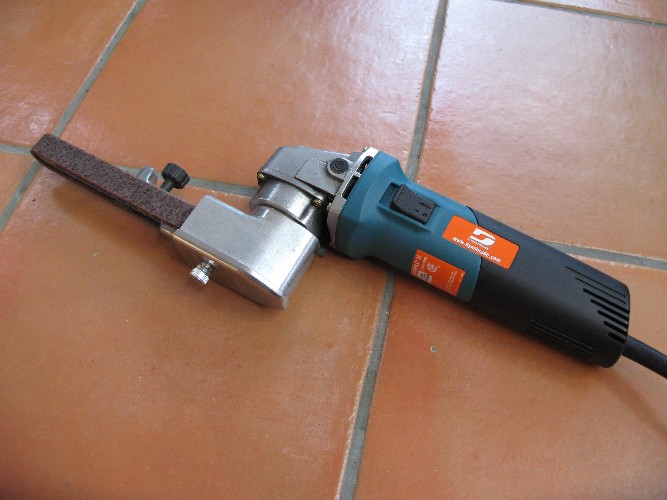
Belt Sander Before I Ditched the Jet Grinder
And now the cheapest tool I ever bought! Words cannot describe this puppy. Once again the heroes at www.tricktools.com sold me this thing. I am not sure but think it was three hundred and something. Of course when it reached the Canadian border the government had to do a little skimming they call duty and taxes. After that I think it bumped the price up to right near $500.
You may think that is a lot for a bench grinder but let me tell you this is no bench grinder… rest assured! Use one of these things twice and you will throw your bench grinder in the dumpster where it belongs! The left hand side had a typical bench grinding stone on it. I threw that out and installed this very dangerous cut off blade with no guard. Sure it is an accident waiting for a place to happen but does it work great for grinding slowly in tight places.
Since I have been getting a grip on my suicidal tendencies I may rig up some kind of guard shortly. It could easily grab a loose flying woolly shirt in mere mili seconds. That of course would lead to a severe pummeling to the shirt wearers body. The good part is cut off blades don't cut well.... they actually burn through the skin quite quickly. This of course cauterizes the wound which of course keeps blood from spraying all over the place. If you haven't found out yet blood can be a bitch to get off your tools and the walls.
Just to note here that the belts on this tool never seem to wear out!!! Plus I think it would be impossible to shred, tear or break one! It seems I use them forever before changing them and they still remove metal fast right up until I do. This is great if you are cheap like me. I can’t even bring my self to throw out the old ones since they still work! Maybe a little slower than when new but what the hell. It is hard to imagine how much metal one belt will remove which makes this tool top value.
Click the underlined words below to buy!
This is one of those tools that you hope your competition
does not find out about!!!
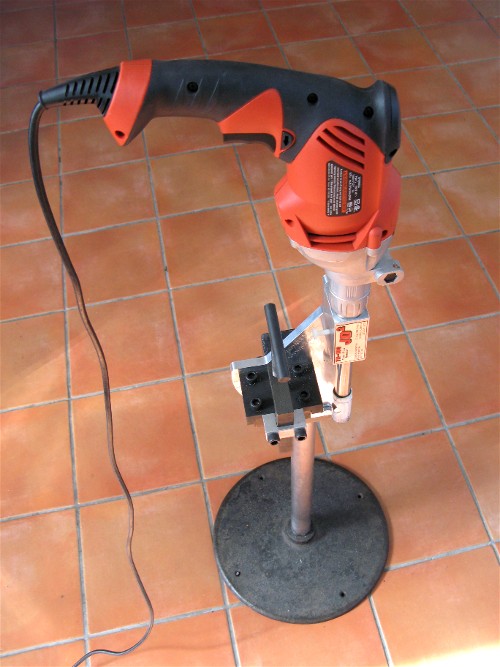
Here We Have The Almighty Dynabrade
These guys ROCK!
They make sanders, all kinds… and I’m not kidding!
I highly recommend checking out this site and downloading their catalog. What they make is beyond belief! This tool has been another one of my better investments. Right now it has a wider kind of polishing belt on it. Normally I have the half inch sanding belts on it. So far I have found the belts never seem to wear out. It takes off metal in hard to reach places like you would not believe. Changing belts is very fast/easy. This is seriously also one of those tools you don’t want your competition to find out about. : )
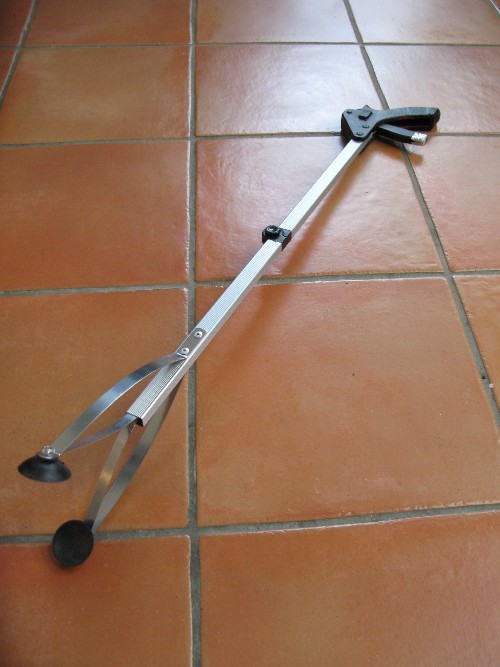
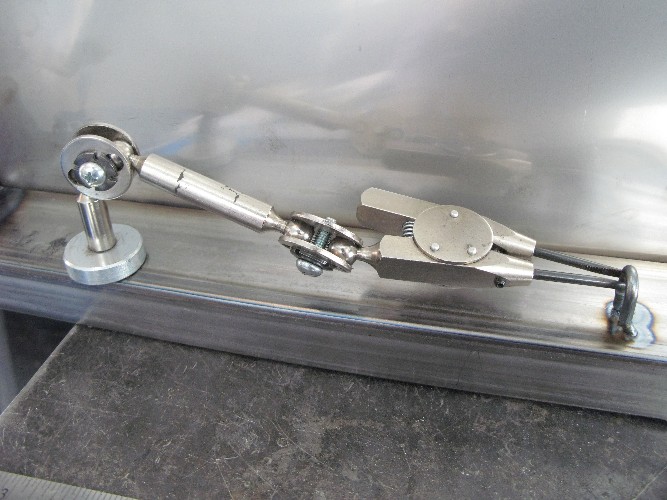
Incredible Pick Up Tool
Here is one of my most favorite time saving tools I have. Oh sure you may be thinking a grampa reaching tool but not the case. This thing can cut shop clean up time in half especially when you get good at it or if you can eat and talk at the same time. It can easily pick a dime off the floor or quickly reach under your bench to pick up stuff. You can be reaching for something with one hand and something else with this at the same time. I installed rare earth magnets in the handle so I can having hanging from my loft railing for easy access. I use it all the time and not because I have to. I run 5k three or four times a week. Seriously once you use these a bit you will want one with-in reach.
Shrink Tubed Magnets on Chisels
Here is a chisel and a center punch that I have attached magnets to. I put the magnets on the tool and then covered in good quality shrink tube. After that I dipped the handle part in that rubber coating you use on tool handles. The magnets are sealed in and always there for sticking the thing to the side of the drill press or where ever you want it. Shrink tube along with that rubber junk you dip tool handles in are a couple of my favorite things to have around.
Third Hand Small Part Holders
This here is one real sweet tool to have and to hold in your collection. What I did here was found a pair of these little gripper things at a garage sale once. There were two attached to a piece of aluminum with a pad of asbestos or similar on it. Jewelers use them for holding small stuff while they solder or weld it. What I did was unscrew the gripper part and arm off the aluminum base. I then got a one inch rare earth magnet and steel cup. I screwed the cup onto the end of the arm, this was very easy since the end of the tube piece was already threaded so it could be attached to the aluminum. I then popped in the magnet and viola. Every time I use these things I am amazed at how well you can maneuver things around into position. Extremely handy for sure. I can use both of them to weld two real small pieces together also. Not something I use that often but when I need them there is no other solution!
As long as you are dumb enough to try something stupid you can sometimes get great results! Surprisingly this cut turned out perfectly. I had to tighten up the bungees every so often to keep the feed pressure right but not a big deal. Needless to say being quarter inch it was one long cut aluminum or not.
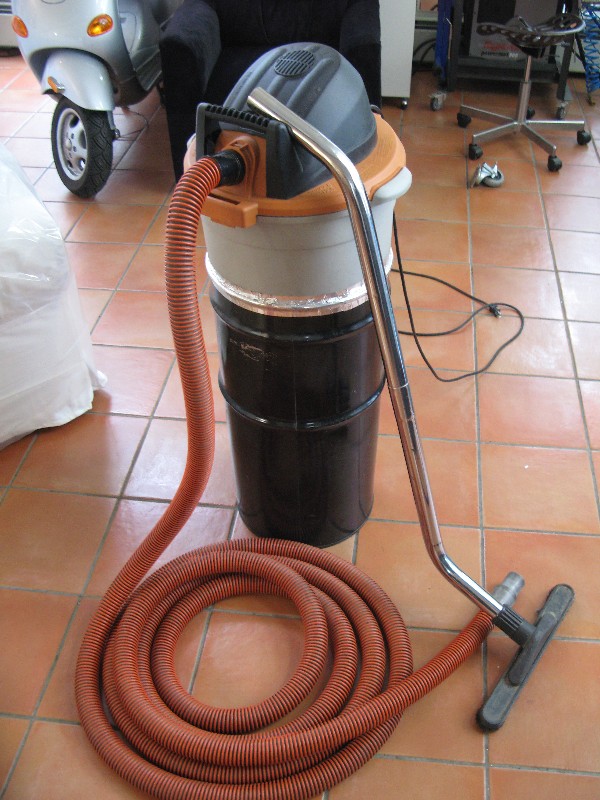
Modified Shop Vac
This modified shop vac was a real score. The Vacuum part I bought at home depot. I then cut the bottom out of it and attached it to a fifteen gallon drum. I then threw away the irritating hose has comes with most shop vacs and bought a 24 footer from Lee Valley tools. It is actually flexible! Not to mention it will reach to most corners of a small wood shop. I then mounted it in one corner of our live/work studio. Worked like a hot dam and rarely needed changing. In fact almost never due to the type of dust I suck up. Mostly fine metal dust, metal chips and typical city dust. None of which has much volume. Thus I went to a smaller more compact wall mount system. The best thing about it is the fact that it holds likely three times or more than the original version. On top of this the exhaust air can be plumbed right outside if you are real picky. For wood dust and chips it is perfect.
The hose was eighty something at Lee Valley, the drum was fifteen at Midland, the vacuum was sixty nine at homeless depot. I chrome handle and end piece I had from another shop vac.
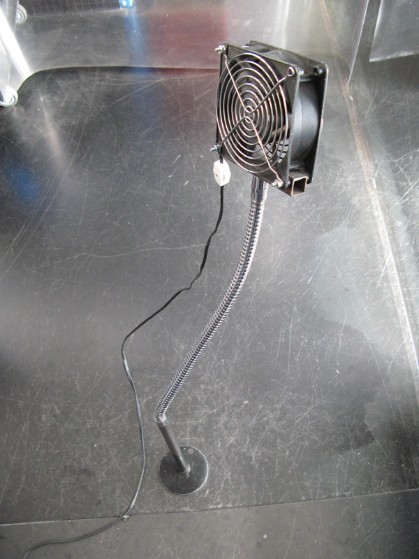
Here is a cool trick that only works if you have a steel floor and a lot of rare earth magnets!! The base has the magnets and sticks nicely to the floor. The fan is mounted on the Lee Valley flex thingy. The nice thing about this is you can place it anywhere and direct the fan exactly where you want to blow the toxic fumes over to the other side of the studio. I still need to mount a toggle switch on it instead of the cheapo iskea piece of junk. Great for when you want to direct a fan on hot parts to speed cooling also.
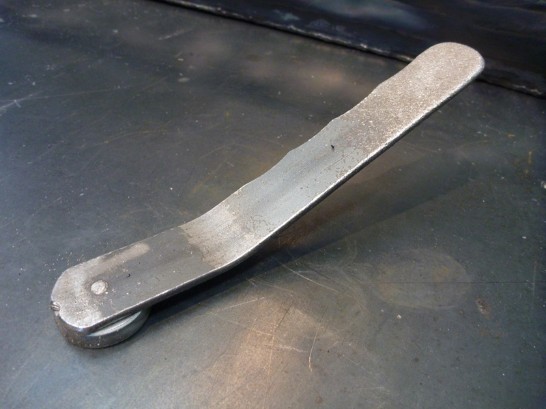
Magnetic Small Part Holder
Here is another real handy beast. It is a piece of one inch flat bar bent slightly and a one inch rare earth magnet cup and magnet attached to it. I keep this one on or near my bench grinder for those times I have something small to polish on the wire wheel. Works like a dang. Also if I am cleaning up a small piece I just cnc'd then I can use the handle part to knock off any remaining slag if there is any. Needless to the magnet in the cup holds very well but if you push too hard then you end up launching the small and often sharp piece.
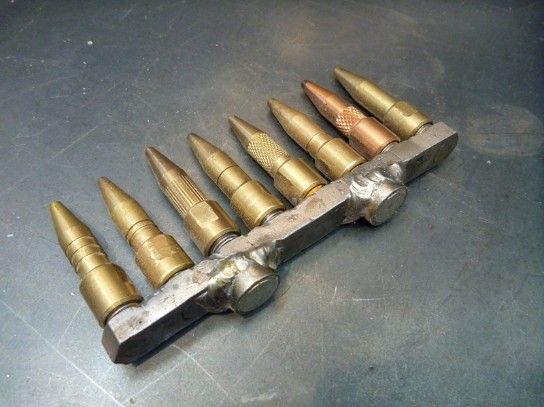
Magnet Henrob Magnetic Tip Holder
Here is a tip holder I rigged up for my cobra...(Dillon..... for you older welders) torch. Once again the power of the rare earth magnet. Of course when the magnets are used in cahoots with a cup the power is even greater. The nice thing about this is I can stick it where ever I am welding so always have it close at hand. The tips thread onto bolts I sawed down and welded onto the bar. It is amazing how much fucking around crap like this takes to rig up but man the time it saves over the years is incredible.

Central Vac System
Here is one of the best scores we installed in our studio... a central vac!! The best thing is by mounting it up on the wall it does not take up any floor space. I plumbed in a hard pipe to the center of the studio and to the loft. We have one long hose which does the whole ground floor of our studio and another shorter one for our loft. One of the best things about this is the fact that after the air goes through the filter it gets plumbed right outside. That way when I am sucking up dust from radioactive materials or other highly toxic, carcinogenic or even explosive stuff I know the fumes from those things are not going right back into our studio air. Now the one downfall of these systems is that a lot are quite noisy. Just the same though the incredible suction more than makes up for the noise factor. In fact small bolts or bits of melted plutonium are no problem at all. I may rig up a sound deadening barrier to tone it down a bit but for now it is not that big an issue.
Another nice thing about this one is it only takes two seconds to open and dump out the bucket. You can often pick these up used on craigslist or garage sales for fifty bucks or less. Ten times better than the bulky old shop vacs that are the worlds most idiotically designed shop tool ever. They take up as much floor space as a table saw, have hoses so stiff you can barely bend them and are extremely awkward to use. In this day and age of space and convenience you would think someone could come up with something even slightly better. The cool thing also with these vacs is you could mount it outside your shop and wipe out all the noise it makes.
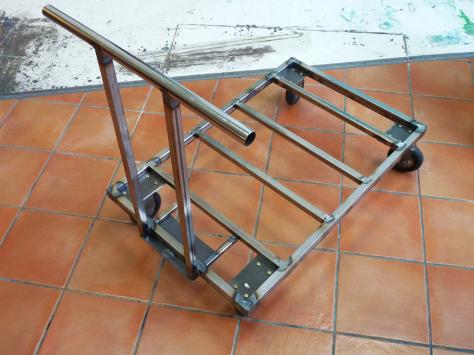
Taking the time to build a custom dolly to serve your needs is never a waste of time. Sure it costs a little more and takes time but at least you will have something that won't break in half when you need it the most. You save the landfill also. I am guessing I can easily move twelve hundred pounds or more on this dolly no problem. I have built a few dollies now and find them very handy.
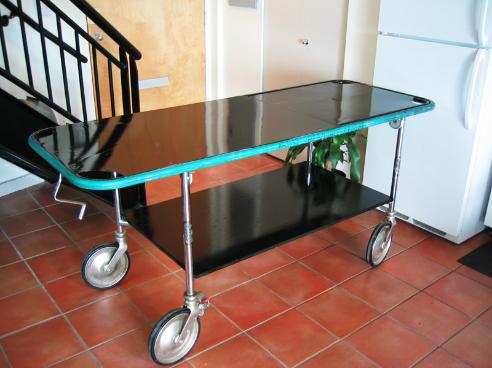
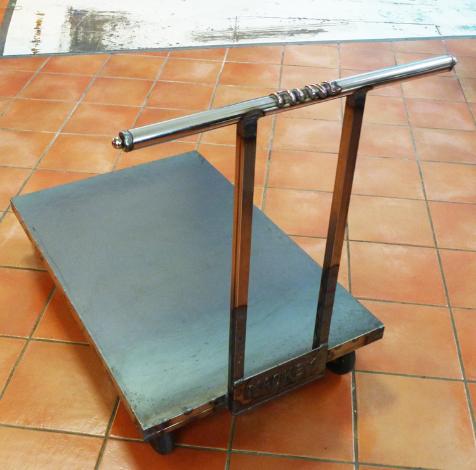
Hey, got an old gurney around you don't need? What a score these things are. This one here I scored off a good tenant here at the ARC we had to evict. He was a good tenant... just could not pay his rent. Anyway after he finally moved out just before the bailiff got here I noticed that he had left this great gurney. At first I was going to heave the thing but then opted to fixer up a bit into a great moving dolly. That is actually what he had it for and man did it work great. So I added the lower shelf and painted it black. There were only leg braces there before. I then painted the top and thought jackpot what a score. This thing will hold a ton and the big wheels means it rolls along without effort. The nice thing is about it is the fact that it comes up to waist height so you don't have to bend over to load it. Plus you have two levels so you can get twice as much on it. Four wheel swivel makes it easy to get around tight corners etc.
After getting this all slicked up though I realized that storage was going to be a real pain. Thus I opted to donate it to the building. I knew it would have only lasted about a few days before someone would have swiped it so I welded the letters ARC in all four legs. I also ground Artist Resource Centre into the rubber on both sides. That sucker has been here now for ten years give or take a couple of years and no one has ever taken it. They have though used the hell out of it. The bloody thing has been a godsend for people moving into or out of the building, moving junk to storage or to studios etc etc. Best tool that the ARC ever got. I have been amazed at how much weight I have seen piled on this thing and still moving with ease.
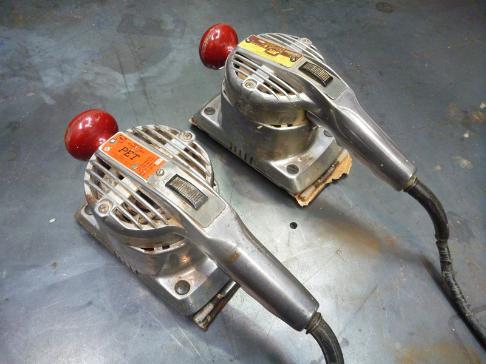
Problem... two vintage PET sanders with wore out pads....
The pads were wore right out on these babies so they could not even be used as the metal would have just dug into the wood or whatever you were sanding.
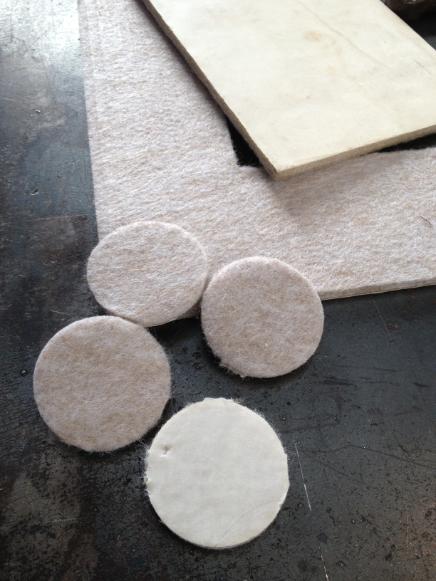
Solution...
Here was the solution at least for now. I could not seem to find some of the rubber padding for these sanders anywhere without spending too much and having to modify it to fit anyway. Thus in a bind I dug out some of that resin impregnated felt padding stuff. Some where I had found a package of it that had one sheet in it also. I cut it to the size, clean all the old foam and glue of the sander and then stuck this on. After that I used it for about two hours wet sanding... yes no the sharpest move but it never fazed the padding. I am still looking for some foam stuff for the other one. That way I will be able to compare which was better. I think the package of padding above was only around five bucks and came with a lot of the round ones for legs also. Pretty cheap fix and seems to be working great.
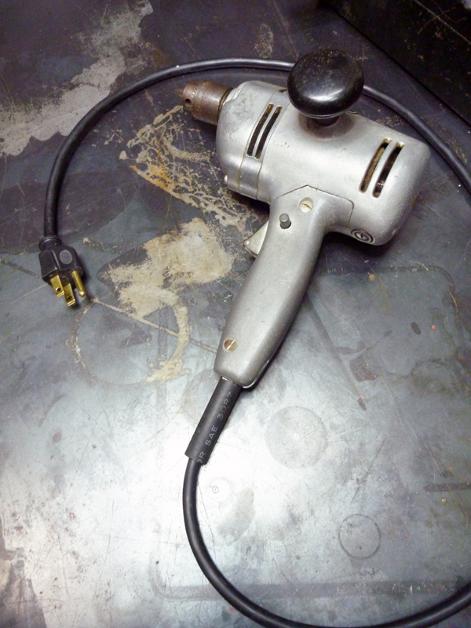
My Highly Unrecommended Way To Change a Power Tool Cord
Click on picture to read more.
If You get on my contact list you can get updates every so often on new work and shows etc that I have coming up. These are titled LIVE ART NEWS IN AMERICA and go out every month or so. Keep up to date on new work, latest books and other funny stuff. Just to note I never sell or give out emails to anyone for any reason.
604-269-3500